I hope you all had a very Merry Christmas! I found it quite hard returning to work today (even though I worked from home!).
My holiday break (yes I still wish I was in college) just wasn’t long enough! Did you feel that way? Much like this whole year, each exciting day of my ‘holiday break’ passed by with lightening speed.
With that said though, it’s always so refreshing returning home and sharing time with the ones I love, even for a short visit. I tried to soak up every moment of my favorite holiday traditions. What are some of your favorite holiday traditions?
Some of my favorite traditions include:
1. Going to my mom’s work on Christmas Eve for the annual “bring-your-kid-to-work-day”. Yes, I’m probably the oldest kid that still attends. This year I brought my mom’s Basset Hound, Myrtle. I’m going through Myrtle withdrawals as we speak.
2. Family time and more family time. Eating time and more eating time. From my Aunt’s annual Christmas Eve’s Eve shindig, to my other Aunt’s southern style Christmas Eve dinner, to my Uncle’s Christmas morning brunch, I really cherish it all. I especially love when my cousins break out their best dance moves!!
3. Still opening my stocking from Santa. The ones on each end were knitted by my mom long ago, before DIY was so cool. She’s my DIY role model 🙂
4. Creating and sending out Brian and I’s annual Christmas card! Give it up Santa! We’re getting on the nice list whether you like it or not 🙂
Not to be all mushy, but just reflecting back on the last few days makes me feel all warm inside. I’m so lucky to have friends and family so thoughtful, kind, and loving. You all rock my socks!
Hope you readers out there, will continue spreading holiday cheer! I plan to!
Stay tuned, next I’ll share one of my other favorite holiday traditions, exchanging Christmas ornaments with my mom. This year I decided to DIY it!
And the climax of our trip finally came! We were going to see one of the new 7 wonders of the world, Machu Picchu! We woke up extra early again (around 5:00 a.m.), to get ready for our big day. We scarfed down breakfast and eagerly walked down the road to catch our 6 am bus. Bus after bus packed us tourists in and then shuttled us up winding and twisting roads to reach our destination.
At 6:30 am we met our energetic and informative tour guide Pascual. All tour guides here receive a special certification in order to take groups around Machu Picchu. With this in mind, I knew we would receive a great tour.
Walking up to our viewing spot of Machu Picchu, the whole city was covered in a blanket of fog so thick I couldn’t even see the city below. Within 5 minutes the fog began trickling away and slowly revealed the ruins below. The build-up and anticipation felt like the slow rise of a curtain on the opening night of a Broadway show. I wouldn’t have wanted to see the city in any other way. It was quite magical.
We reveled in the view of the rising sun over the Andes Mountains which provided many new views of Machu Picchu. After snapping 500 photos of us and Machu Picchu, we moved on to begin our tour.
FYI, I was feeling a little under the weather this day. I picked up a little cold, I think from the drastic change in temperature, so Brian was the main photog for the day.
Over the next 2 hours we followed Pascual in and around the ruins, learning about the many tales of Machu Picchu, passing a llama (aka Machu Picchu lawn mowers) along the way. For those of you who don’t know, it is believed Machu Picchu was a royal retreat as well as an aristocratic training center for the Incans. For example, this is where kids of priests would go to learn to be priests.
After the tour, Brian and I began our ascent up Machu Picchu Mountain which towers 2000 ft over Machu Picchu.
Oh baby, I knew this hike wasn’t gonna be an easy hike.
Although Machu Picchu is at a much lower elevation than Cusco, (around 8,000 vs. 11,000), we still had to walk about 2,000 steps to reach the peek of Machu Picchu Mountain. With a little bit of a cold, it was still pretty hard to breath so we took a few short breaks to enjoy the view and to avoid passing out.
With each step closer to the summit, the stairs shrank smaller and smaller and became narrower and narrower. At a few points I held my breath as we passed by other hikers, trying my best not to think about plummeting to my death. I truly hate the feeling when you look over the side of a high building or mountain and your stomach instantly drops.
About 1 hr 5 minutes later we finally reached the top. We were pretty proud of ourselves, as it’s supposed to take 1 hr 30 minutes. Looking below Machu Picchu was now a teeny tiny city. I nervously posed for a few photos and tried to breath in the process.
You can see tiny Machu Picchu below.
After basking in some much appreciated warm sun and relaxing a bit, we began our travel back down. At this point, my legs felt like jellllllo. It was actually harder going down than going up. At one point my legs gave up on me and I fell down the stairs. I know. SHOCKER (I’m the clumsiest person I know)! Luckily it wasn’t off the side of the mountain.
I loved, loved this hike, but I must say by the end, I never wanted to see another stair in my life.
After resting for a bit again, Brian and I walked around and made our way to the exit. Another bonus, we picked up another passport stamp! Woop woop (we’re passport stamp aficionados).
I couldn’t have been happier riding the bus back down to Aguas Calientes. Blissfully exhausted, I was honored to visit a place so sacred to Peru and the world.
Here’s an article about Machu Picchu from National Geographicif you want to take a peek and learn a few secrets about this magical city.
If you liked this post about Peru, you might want to check these out too!
I went on the DC Santa Crawl this past weekend. Most of my friends know I’m really, really into costumes. My one friend even commented, “Becca I think I could invite you over to watch paint dry and if I told you we were wearing costumes, you would come.” So needless to say, the costume was the most important part to me!
I searched around on Pinterest and found this adorable Frosty the Snowman costume here and here. After seeing these adorable costumes, I knew immediately I wanted to make my own.
I decided to give a crack at making my own tutu. I searched around and found a few posts describing how to make the tutu and it didn’t seem too too (tu tu 🙂 ) difficult. So here’s the steps…
Supplies:
6-8 yards of white tulle
3/4 elastic (JoAnn Fabrics sells it in a pack)
Sharp Scissors
Step 1: Buy Tulle & Elastic
I went to JoAnn Fabrics to buy my supplies. I bought 7 yards of tulle and a pack of 3/4 inches elastic. Depending on how long you would like your tutu, I would buy 6-8 yards. I had originally planned to just wear tights underneath and wanted my tutu to be medium length so I bought 7 yards.
Step 2: Cut Elastic and strips of tulle
Measure your waist and then add about 8 inches to make sure you have enough to tie the tutu together. I tied a knot 4 inches from the end on each side.
Unto the tulle. First I measured down my leg to see where I wanted my tutu to hit. I wanted mine medium length, so I measured about 11 inches down. I added about 1/2 to 1 inch to allow for tying the loop. You will fold over your tulle, so you just double your number. So total my tulle strips were 24 inches long (12 inches folded over).
I cut my tulle about 3 inches wide, but I’ve seen others that cut it as wide as 6 inches. Looking back, if I cut it wider the tutu prob would have taken less time to make.
Step 3: Tying the Tulle
I piled 3 strips of tulle together. Then made a loop underneath the elastic and pulled the end of the tulle through the loop. I made sure to pull it tight. You will repeat this about 100 times going down the elastic.
As you’re working, I would hold it around your waist to make sure it’s the length you would like. Also, as you get closer to the end I would hold it around your waist again to see if you can stop tying tulle before your knot.
Step 4: Tie the knot
After you have completed all your tulle tying, try it on and tie the knot in the back. I adjusted a few pieces of tulle to make them shorter.
About 4 hours later (more like 1 hr later) ….TA DA! Tutu swirling time!!!
I went to Michaels to buy my supplies for the hat. You’ll need 2 sheets of black foam ( I chose sparkly foam), 1 -2 small poinsettias (again went with sparkly), and a headband.
Step 2: Make the top part of your hat
Grab a drink cozy. This will be your measuring tool for the top of your top hat. I wrapped the sparkly foam around the cozy, making sure the foam overlapped so I could glue it. Then I used the cozy again to cut the circle for the very top of the hat and also for the three buttons.
Step 3: Make the brim of your hat
Grab a small plate to trace the brim and cut.
Step 4: Glue the pieces together
I glued the top of the top hat together first. Then placed the circle inside the cylinder, and then glued the top to the brim.
Step 5: Glue the flower on
Cut your sparkly poinsettia and glue it to your hat.
Step 6: Glue some more
Then glue the hat to a headband.
And your proper topper is finally complete.
And here’s the full shabang!
This Frosty really had a full day of Holiday cheering at the bar crawl, gift giving at a white elephant party, and then later ice skating in Georgetown.
Exhausted, I literally melted into bed that night.
My twin Frosty!
Santa Bar Crawl fun! Check out my friend Antwone’s photos here to view more photos from the bar crawl. He was a hired photographer for the event.
Frosty gift-giving at a White Elephant Party.
Frosty in her natural environment, ice skating.
Thought I would end with this 🙂 Hearing this song always brings me holiday cheer.
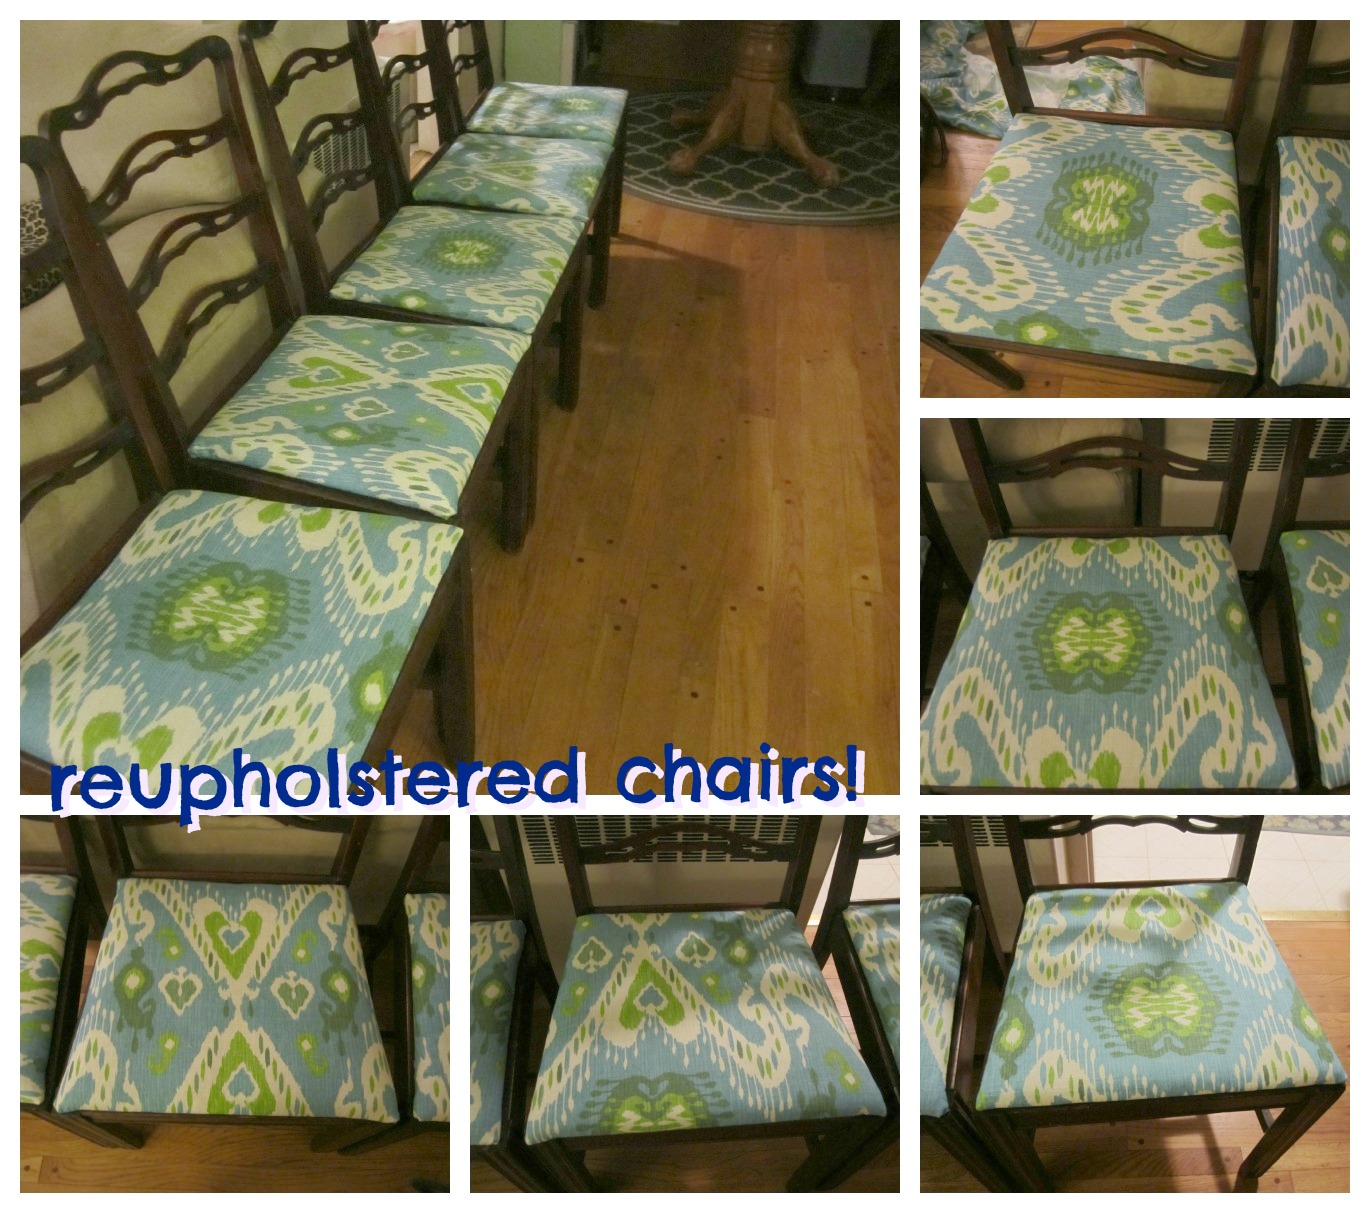
While home in Richmond over Thanksgiving, I did some DIY shopping with my mom. I’d been staring at our dining room table and chairs for over two months now, knowing that their current state just wasn’t living up to their potential.
I bought the table off of craigslist before Brian and I moved in together for $100. It came with 5 Parsons that I plan to ambitiously reupholster at a later date (only two of them of the five).
The chairs, I bought for $65 from my neighbor who works at Clash in Trash in Ashland, Virginia. This shop is one of my favorite places to go for inspiration and furniture browsing. They always have unique pieces that inspire me to DIY even more. I think I have about 4 pieces of furniture from there (and that’s a lot considering I live in a small DC apartment).
Okay, back to our shopping trip. We started at Thrill of the Hunt in Ashland to pick up some much raved about Annie Sloan Chalk Paint. Thrill of the Hunt is another one of my favorite, inspiration inducing stores. I’ve seen so many pieces they’ve given new life. Woowee, they have some serious DIY skills. Also love that it’s owned by one of my high school friend’s family! So needless to say, I knew there was only one place to go to pick up my DIY supplies.
In case you haven’t heard of Annie Sloan chalk paint, it’s supposed to be this very pristine paint that can be used on most any DIY furniture project. I was drawn to it because you can paint over a piece of furniture without sanding or priming it. I haven’t tested it out yet, so when I do paint the table I’ll be sure to blog about it!
Our next stop was toU-fab Fabrics, a discount fabric store located in the Fan in Richmond. I had heard a lot about this place from Thrill of the Hunt owners and from Young House Love.
Walking into the store, with rows and rows of brightly colored fabric, U-fab truly felt like a fabric wonderland. I seriously wanted about 5 different fabrics and I only needed one. With some help from the friendly U-Fab Fabrics employees, I picked this awesome Waverly pattern. I’ve lusted over a few Waverly patterns online, so I’m not surprised the one I picked was Waverly. My fabric was about $15 a yard, but U-fab has plenty of discounted fabric even as low as $2.99 a yard. Pretty darn awesome.
Reupholstering time!
What you’ll need:
Staple Gun
Pinking shears or really sharp scissors
Measuring tape
A fun male model (optional, but highly recommended)
So I didn’t look up anything for reupholstering. Just figured I’d wing it.
Lucky for me the the chair seats were already removed from the chair base so we didn’t have to unscrew them.
I first decided what pattern I wanted on the chair. Brian and I decided each chair should have a different pattern.
I then cut the fabric about 3 inches longer on each side of the seat to make sure I would have enough to pull the fabric tightly around the seat.
I stapled two parallel sides with about 3 staples, leaving enough room to fold the other sides.
Then, I basically just folded each side like I was folding a present. See how I did it below.
It honestly was a super easy project and I finished it pretty quickly! I cleaned up the chairs with goo-gone and Brian is planning to screw the seats unto the chairs. I just love the way they turned out. Now the chairs have new life! I may paint them at a later date, but for now I’m happy.
Total Cost for this Project:
$65 for 5 chairs
$50 for 3 yards of fabric
$10 for goo-gone and screws
Total Cost: $125
Here are some other reupholster blog posts that may be helpful:
I got to meet my favorite DIYers, Sherry and John from Young House Love , ya’ll. Oh me, oh my!! This must be what a 12 year old girl feels like waiting in line to meet Justin Bieber…only with more girls and more screaming! I was just too excited to meet these DIY rockstars.
When driving home from work, of course there was a ton of traffic. Hey it’s D.C. I was sitting in my car. Minute by minute, the anticipation continuing to build.
About an hour and a half later, I finally arrived at my apartment, ran upstairs to grab photos of our Young House Love inspired project to share with Sherry and John, and booked it out of the door. I knew from reading earlier posts from their book tour that the lines would be insanely long. So I ran from my apartment in Foggy Bottom to Flor in Georgetown. Yep ran in my riding boots, skirt and peacoat to make sure I could snag a good spot in line. It’s only about 10 minute walk, so really not that crazy right??…ha I know it’s crazy.
Luckily for me, my awesome, on-time friends were already in line so I scooted in with them (thanks for the people behind us for being so kind) and eagerly waited for our turn. The people at Flor were awesome hosts and sponsored Captain Cookie & The Milkmanto come out and provide warm cookies and cider. Let me tell ya, that pumpkin snickerdoodle -ish cookie was so delish and the cider warmed me right up. Just the fuel I needed to wait a little longer.
About 2 hours and ten frozen toes later we were finally at the beginning of the line. We thought we had spotted John a little early. Some friends even snapped some photos thinking it was him. Later we realized it was John’s Flor-doppleganger. You can read more about it on my friend’s blog Skillets. Sneakers. Style.
Anywho, about 10 minutes later and we were inside warming our bones with some wine and buttery popcorn, again provided by Flor. They sure do know the way to my heart.
Just an FYI, I changed a setting on my phone, so the photos accidentally came out red tinted. Guess the room was just so filled with Young House Love 🙂
And the moment came. It was our tour to gush and blush over Sherry and John. And let me tell ya they were totally worth the wait. They listened intently while I shared my DIY wardrobe project inspired by them. Sherry even offered to come over to check the project out (of course I would love you to Sherry!). They were so genuine and happy to sign 2334597345 copies of their book.
Sherry and John loved that they would be Katie’s Christmas present for her friend!
Unfortunately, Flor sold out of their book so I just purchased one from Mongrel, an awesome card shop in my hometown Richmond. I can’t wait for it to arrive and place my photo and book plate inside!
Woop woop! Just writing this post makes me smile. Thanks again Sherry and John for showing the Capital City lots of love.